While I do not have any photos of the progress I did the other day, I have removed the track from the ACL diamond to the bridge and beyond going towards the yard. The only remaining track from that section to the yard is the track across the double track bridge and turn out just past the bridge.
My current intent is to save the work I have done with the house on the hill scene as well as the river scene and re-install the track in a more free laced prototype fashion. Meaning the curves will be broader for better operations of all rolling stock and actual appearance.
As for my current yard section (Griffin) I'm undecided on the fate of that area. I would like to salvage the work and just modify the bench work. I have been doing some minor engineering work on how to save it and best turn it into a single module.
I have also considered a complete rebuild of the yard as well but due to money issues (new construction costs and lack of available Atlas code 55 turn outs) I am highly considering the stand alone module option and saving money for a newer yard later and changing the current yard to Raymond. That is if and when I can obtain enough turn outs to do such.
Anyways enough for the ramblings, just letting you all know that I have been actually doing something with the layout in my ever busy life.
Wednesday, May 14, 2014


Sunday, May 19, 2013
Down but not out
Well since my last post about the layout, I have had to move and take the layout apart.
It did survive the move as it was designed to do. There is some track repairs and then some scenery repairs that will have to be made before trains once again roll. But the main section that was completed, the Griffin area, has been temporarily mounted on the wall to keep it from getting any damage. That module will also receive some upgrades to it as it will no longer be an end module with the track returning to the back side. It will be reconfigured to have another module connect to it on the facing right side. The module that was connected to it on the facing left, will also receive some track upgrades as well.
I do not have a new track plan for the layout but the layout will grow in size to about three times the size it was originally build. It was originally approximately 60 sq ft and will grow to approx. a 12x18 layout with the depth of the layout being two feet deep. This is the tentative plan as of right now. There are some other options that I am considering and one of them is to run it as a point to point layout along three walls of my new train room. The length of two wall runs would be 18ft and the other would be 24ft. As there are quite a few options that I have, I have yet to come to a set plan but when I do, it will be presented here.
It did survive the move as it was designed to do. There is some track repairs and then some scenery repairs that will have to be made before trains once again roll. But the main section that was completed, the Griffin area, has been temporarily mounted on the wall to keep it from getting any damage. That module will also receive some upgrades to it as it will no longer be an end module with the track returning to the back side. It will be reconfigured to have another module connect to it on the facing right side. The module that was connected to it on the facing left, will also receive some track upgrades as well.
I do not have a new track plan for the layout but the layout will grow in size to about three times the size it was originally build. It was originally approximately 60 sq ft and will grow to approx. a 12x18 layout with the depth of the layout being two feet deep. This is the tentative plan as of right now. There are some other options that I am considering and one of them is to run it as a point to point layout along three walls of my new train room. The length of two wall runs would be 18ft and the other would be 24ft. As there are quite a few options that I have, I have yet to come to a set plan but when I do, it will be presented here.
Tuesday, January 1, 2013
Goal Almost Complete
Well I had a goal of getting the Griifin area to a stage of being complete without all the details by the end of 2012. This goal was to have the area completed enough to give a non-modeler a sense that it was complete. Well I did not meet that goal completely but I made enormous headway in the past 2 months that I have been working on the area. From the previous post that I have made, I had to work on buildings, build a road and form a hill for the road bridge, do scenery, make trees etc. Well I would say that I achieved 85% of my goal. There is a section of the town that has an open space that I have decided to fill with two buildings that I have to build, paint and eventually detail. Also the tree making project continues. I think that I still need to make about 20 something trees to get the scene where I want it to be. Well here are the current pics of the progress.
I also built a fence and placed around the parking lot of the freight house to break up the openness of the scene.


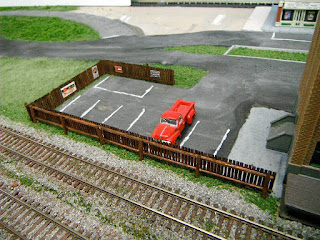


I also built a fence and placed around the parking lot of the freight house to break up the openness of the scene.


Saturday, December 8, 2012
Some Glue is Still Wet.....
Well some of the glue is still drying from my tree planting party I had
today. Here is the latest batch of the updated photos of the work I have
completed. Hope that you all enjoy.


Tuesday, December 4, 2012
Sunday, December 2, 2012
Well as of late, I have been busy working and doing family things and
not completed much time on the layout. But I have completed the segment
of the road that is part of the section that I am working to get semi
complete soon as possible. In the following photos, you will see that I
have painted my side walk and got the road completed. In the last photo,
you can see a rather large gap between the road and the tracks, still
undecided as to what I am going to do to that area. I may leave it open
or drop some buildings in it. There are some other areas that are in the
same undecided stage. But the next step is to mix up the India ink wash
and "pave" the roads and get side walks installed and "plant" the
buildings.


Thursday, November 1, 2012
Making a hill and a road
Well I am in the process of connecting my main street to the rest of the world. I have had a bridge to no where for quite a while on the layout. Some time ago, I made the hill that will carry the road from town up and over the bridge. I have now completed the forming of the hill and partially completed the road to the bridge.
The process that I used was to stack layers of floral styrafoam up to get close to the road level of the bridge. Then I glues them together and begin to shape the hill with a knife. I then glued the hill in place with hot glue. To round out the hill, I took news paper and balled up and glued with hot glue around the hill. Next step was to cut strips of plaster cloth into about 12 inch strips. I layered the strips on the hill. The final step was to mix up a bowl of plaster and fill in some low spots and begin to connect the roads together.
In the photos you can see the process, the only item left to do is connect the lanes together. In town, the lanes are separated and flow of traffic is on one way streets down main street.


The process that I used was to stack layers of floral styrafoam up to get close to the road level of the bridge. Then I glues them together and begin to shape the hill with a knife. I then glued the hill in place with hot glue. To round out the hill, I took news paper and balled up and glued with hot glue around the hill. Next step was to cut strips of plaster cloth into about 12 inch strips. I layered the strips on the hill. The final step was to mix up a bowl of plaster and fill in some low spots and begin to connect the roads together.
In the photos you can see the process, the only item left to do is connect the lanes together. In town, the lanes are separated and flow of traffic is on one way streets down main street.


Subscribe to:
Posts (Atom)